What Does Print-Ready Artwork Mean? A Guide to Preparing Files for Printing
If you're ordering professional printing, you may have come across the term print-ready artwork. But what does it actually mean, and how do you know whether your design is ready to send to a printer?
Whether you've designed a business card, flyer, leaflet, poster or invitation, there are a few important things to check before uploading your file. In this guide, we'll explain what makes artwork print-ready, how to prepare your design correctly and how to avoid some of the most common printing problems.
Quick answer: Print-ready artwork is a finished design that has been prepared for professional printing. It should be the correct size, have suitable image resolution, include bleed where required, keep important content inside the safe area and contain the correct text and images.
What Is Print-Ready Artwork?
Print-ready artwork is a digital file that contains everything needed to reproduce your design as a finished printed product, without requiring further design changes.
For example, if you're ordering A5 flyers, your artwork should have the correct A5 proportions, include any required bleed and contain images and text suitable for printing at that size.
The file should also contain the final version of your design. This means the wording, telephone numbers, prices, dates and other details have been checked and are ready to print.
A design can look excellent on a computer screen without necessarily being print-ready. Screen displays can hide problems such as low-resolution images, incorrect dimensions or important text positioned too close to the edge.
Why Is Print-Ready Artwork Important?
Preparing your artwork correctly helps ensure that the printed product looks as intended.
Professional printing involves reproducing your artwork at a physical size and, in many cases, cutting the printed sheet to its finished dimensions.
If the original artwork has been created at the wrong size, contains poor-quality images or doesn't allow for trimming, those issues can become visible in the finished printing.
Taking a little time to check your file before ordering can help prevent unwanted white edges, missing information, blurry photographs and other avoidable problems.
1. Make Sure Your Artwork Is the Correct Size
One of the first things to check is whether your artwork matches the finished size of the product you want to order.
For example, some common UK print sizes are:
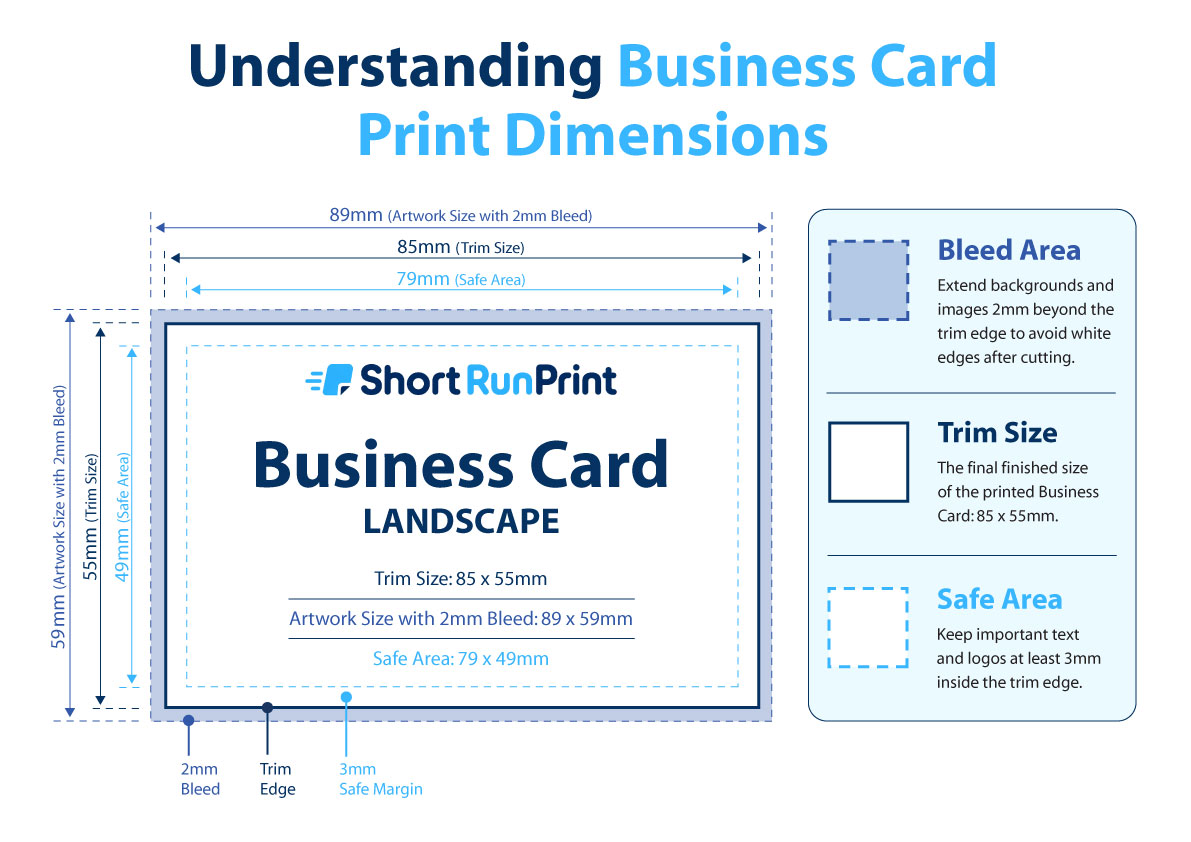
- UK business card: 85 × 55 mm
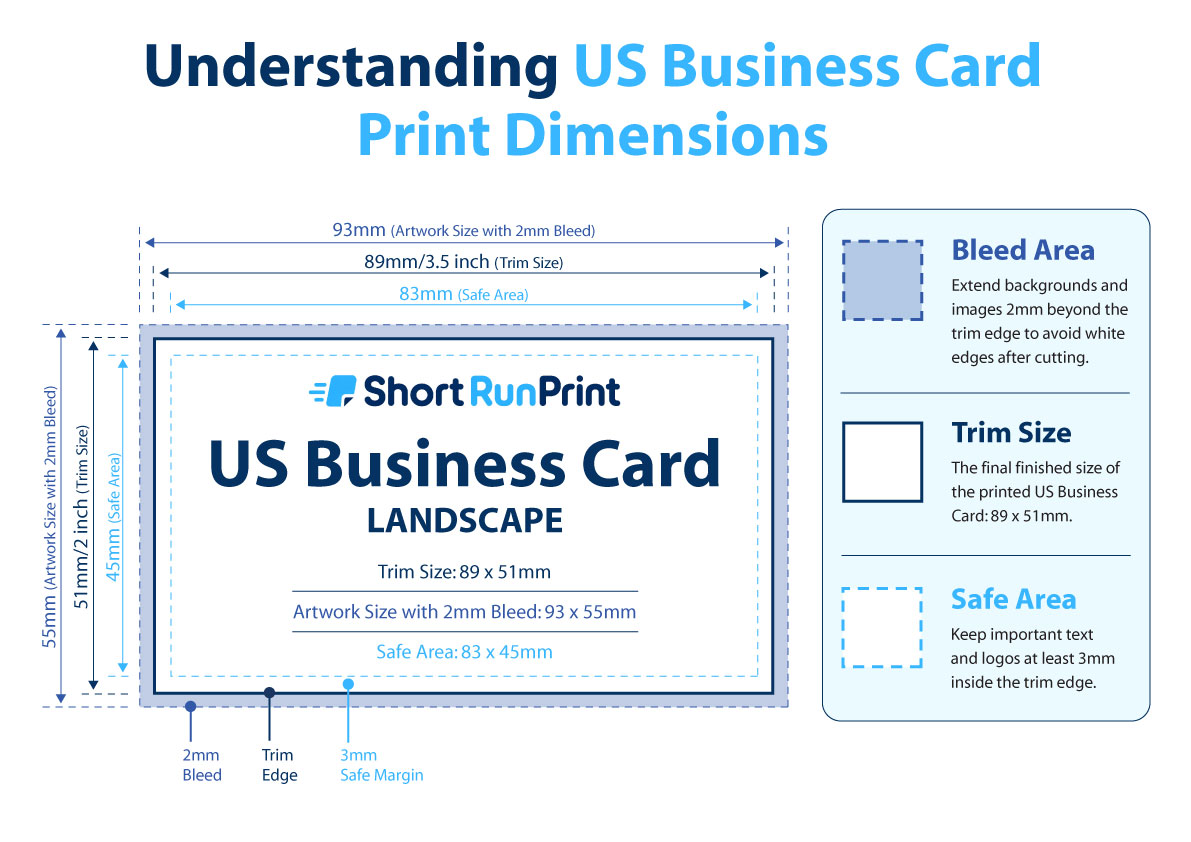
- US business card: 89 × 51 mm
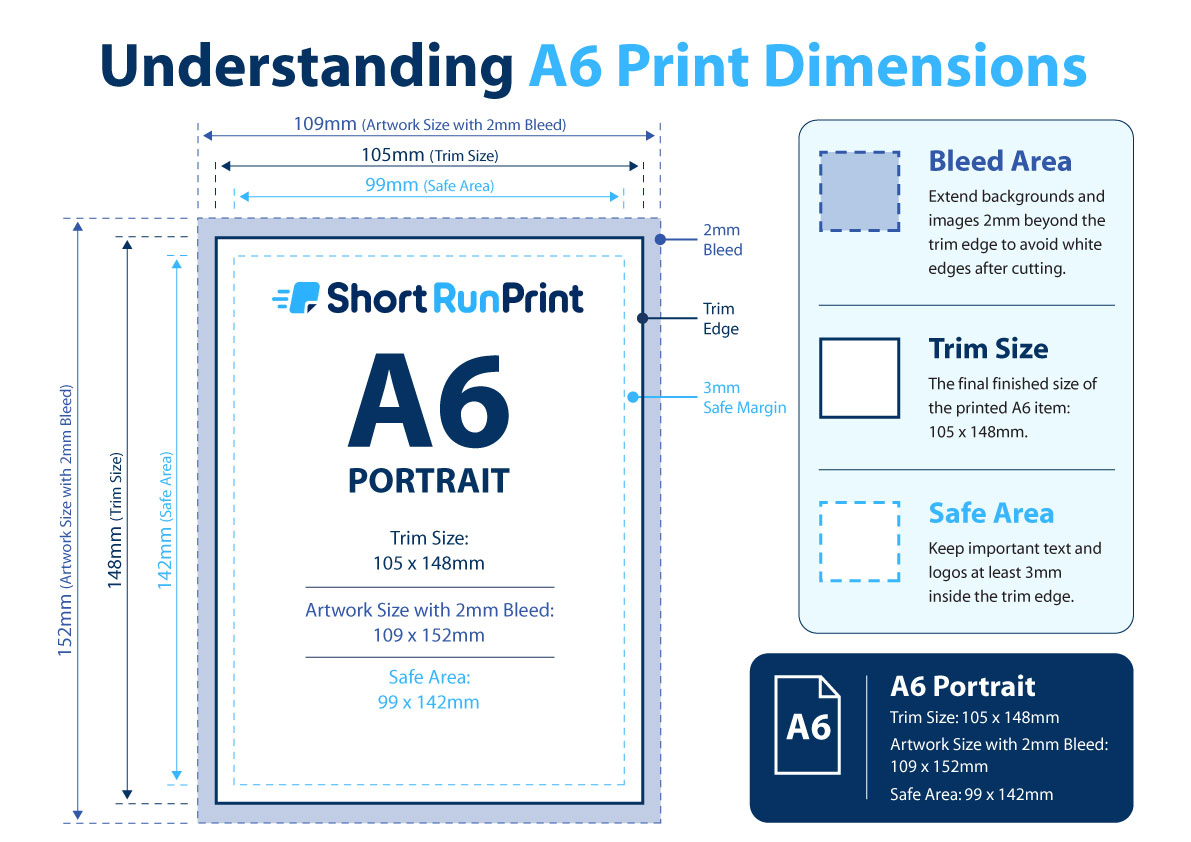
- A6 flyer: 105 × 148 mm
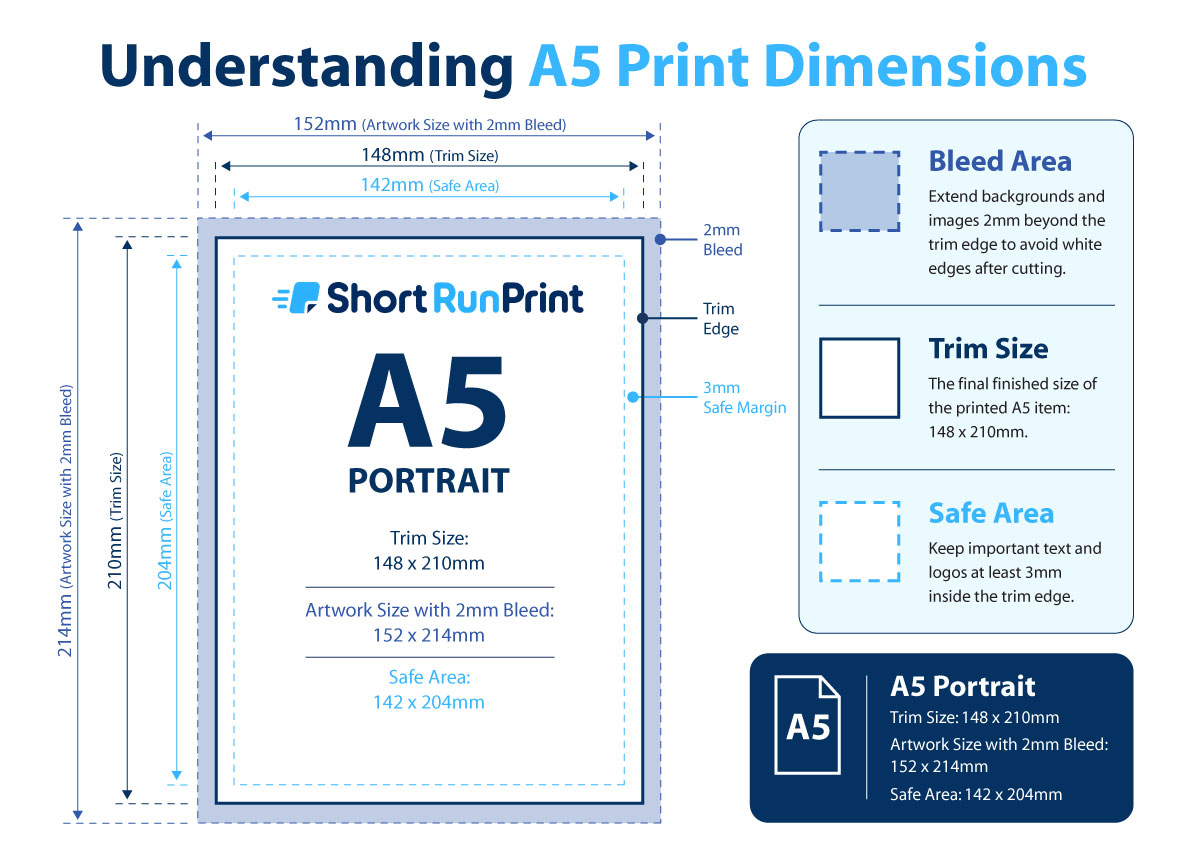
- A5 flyer: 148 × 210 mm
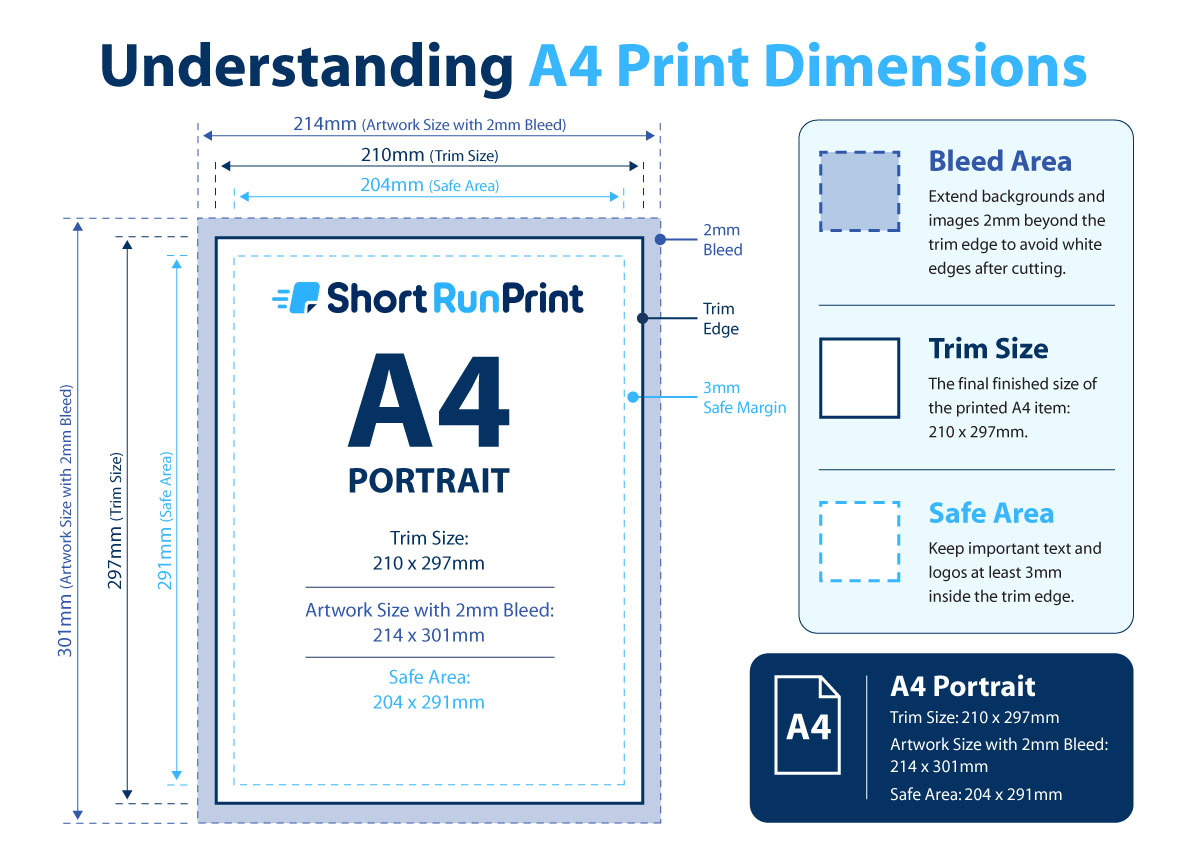
- A4 flyer: 210 × 297 mm
- DL flyer: 99 × 210 mm
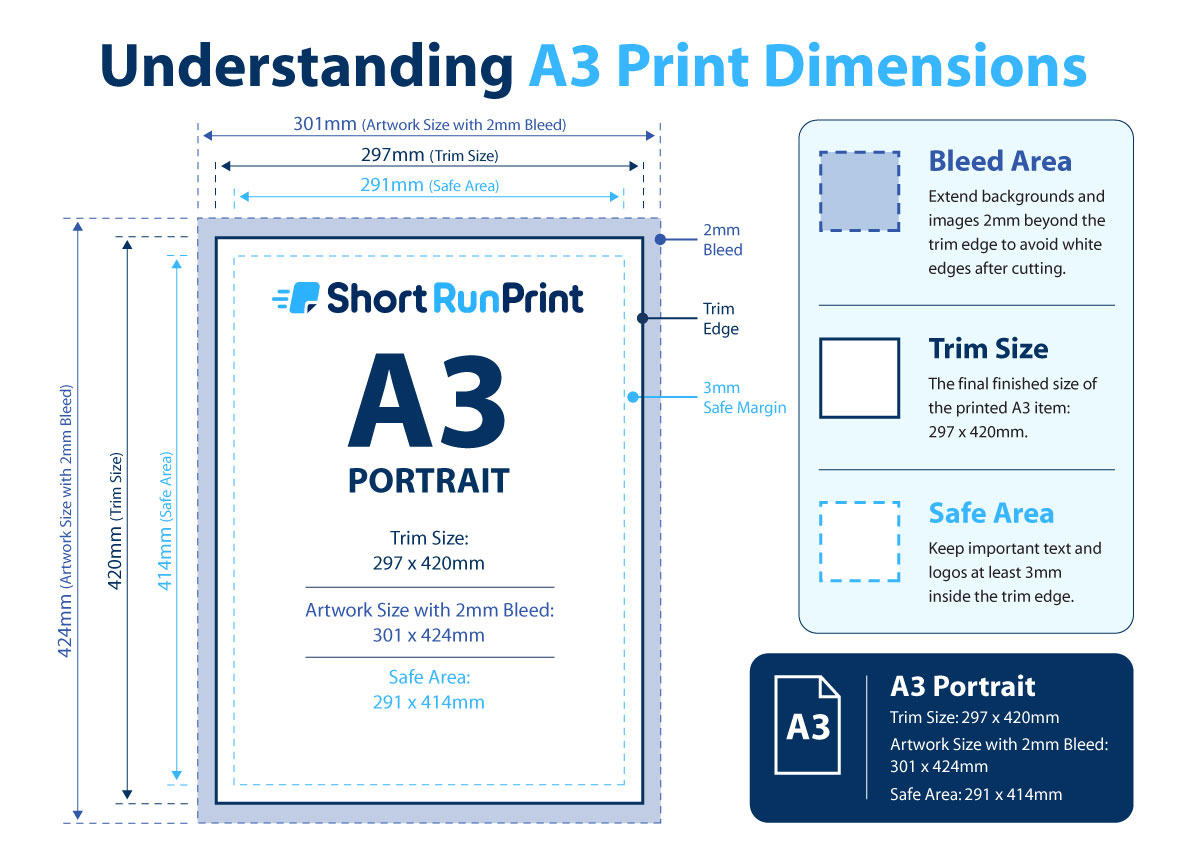
- A3 poster: 297 × 420 mm
These are the finished dimensions, before any additional bleed is included.
If you're ordering an A5 flyer, for example, the main artwork should match the proportions of 148 × 210 mm.
A square image won't automatically fit an A5 flyer without either cropping part of the design or leaving additional space around it. Starting with the correct proportions makes preparing the file much easier.
2. Check the Orientation of Your Design
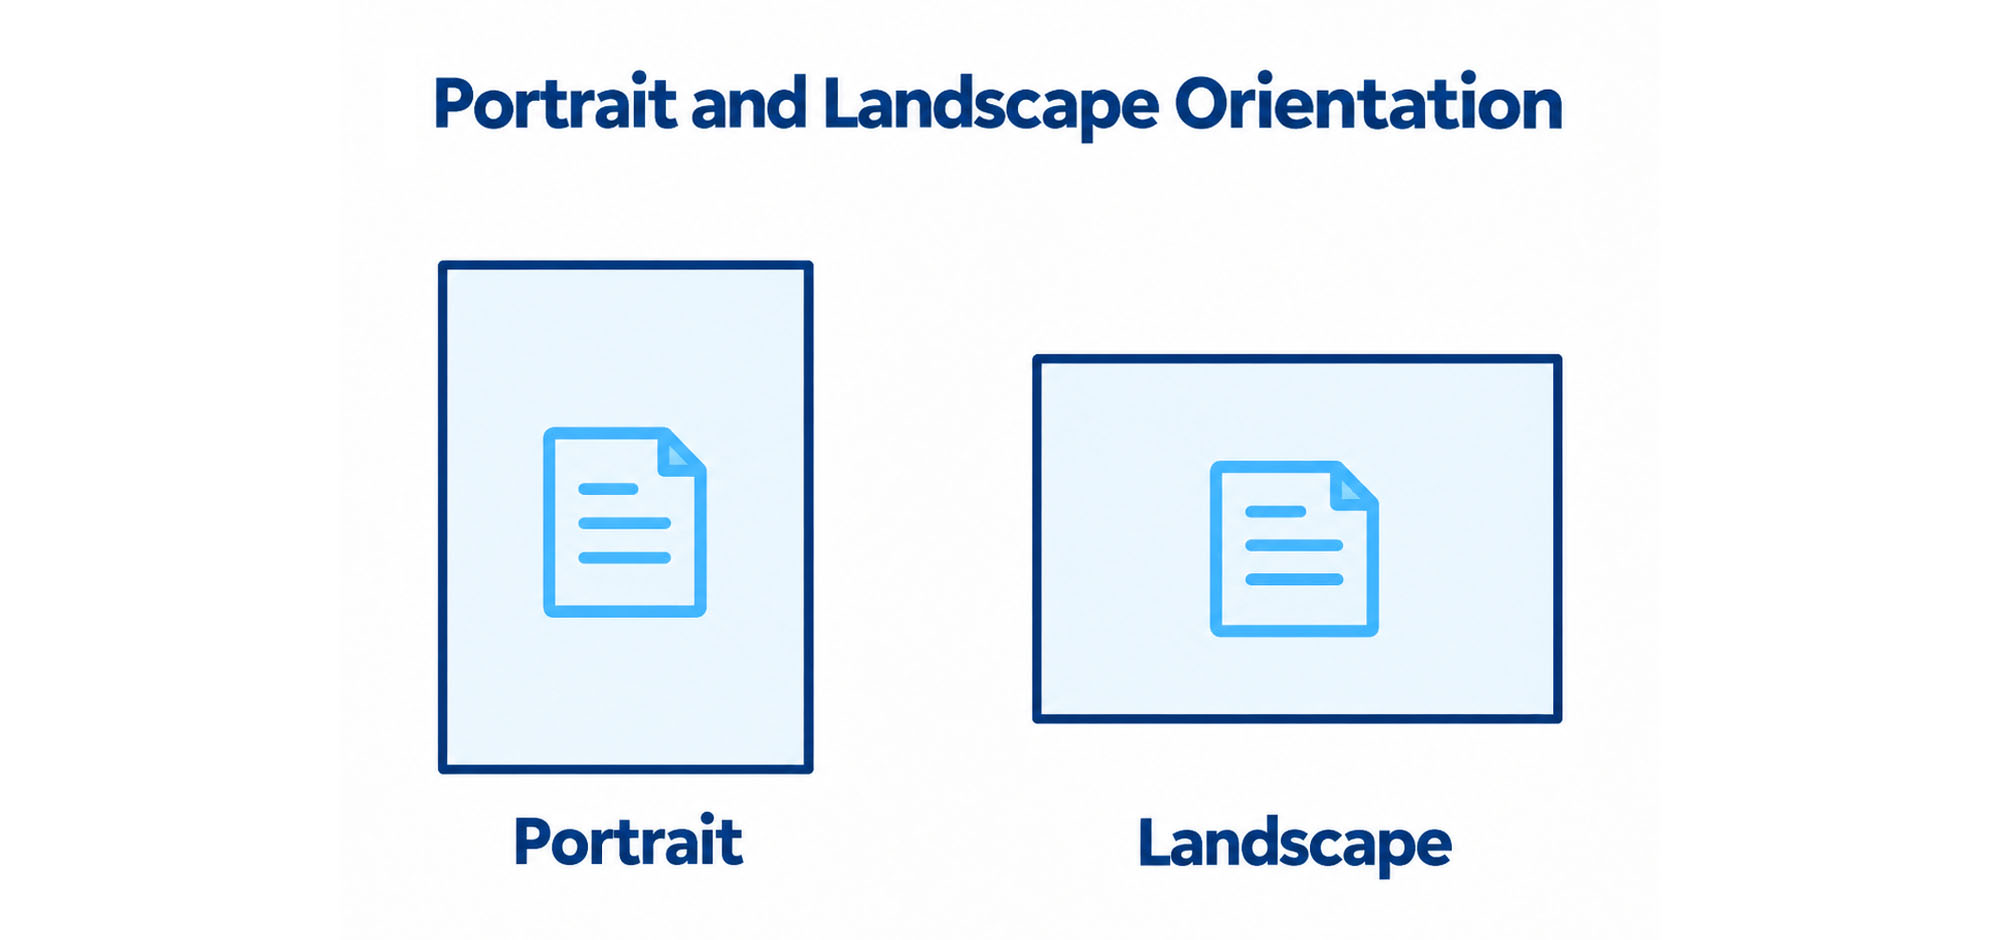
Most printed products can be designed in portrait or landscape orientation.
Portrait artwork is taller than it is wide, while landscape artwork is wider than it is tall.
If your design is intended to be landscape, make sure the file has been created that way rather than simply rotating a portrait design without adjusting its layout.
For folded products, orientation can be especially important because the position of the fold affects how the finished design will be viewed. Always check the Artwork Guide for the particular product you're ordering.
3. Include Bleed Where Required
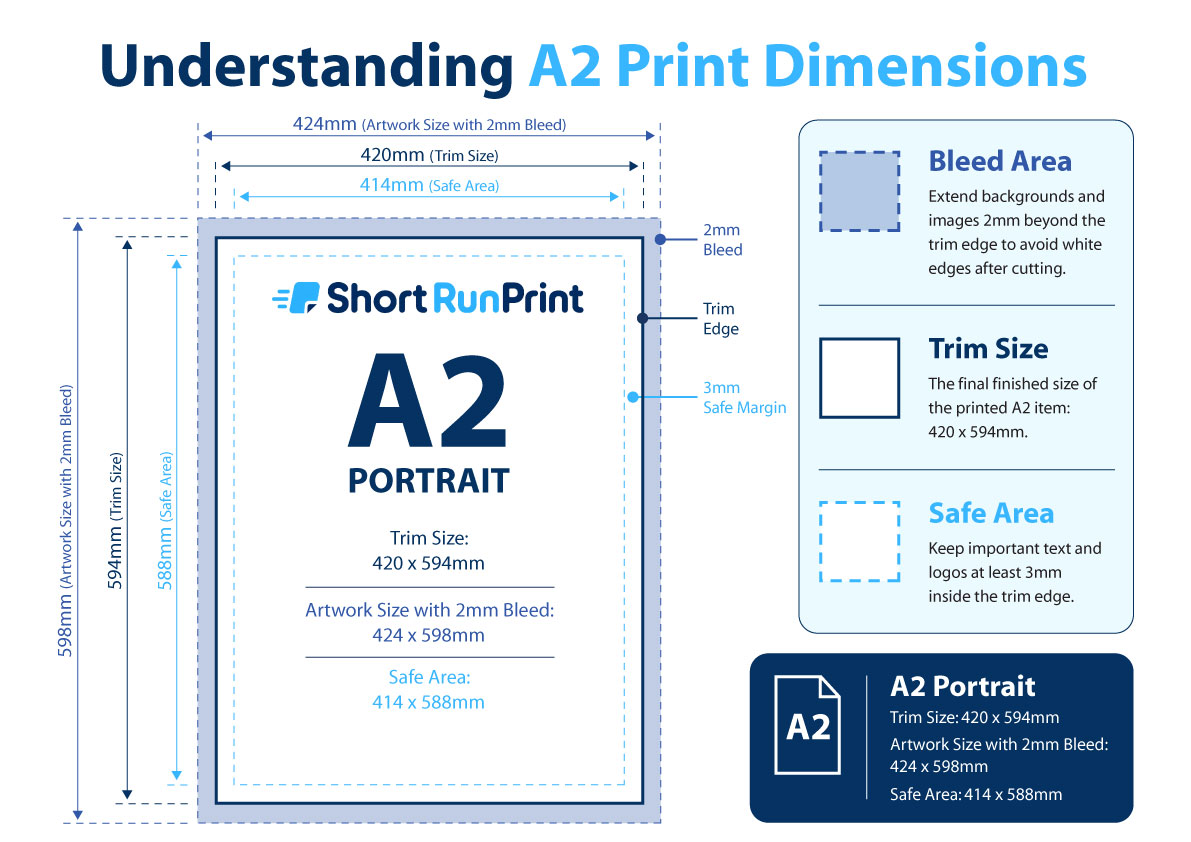
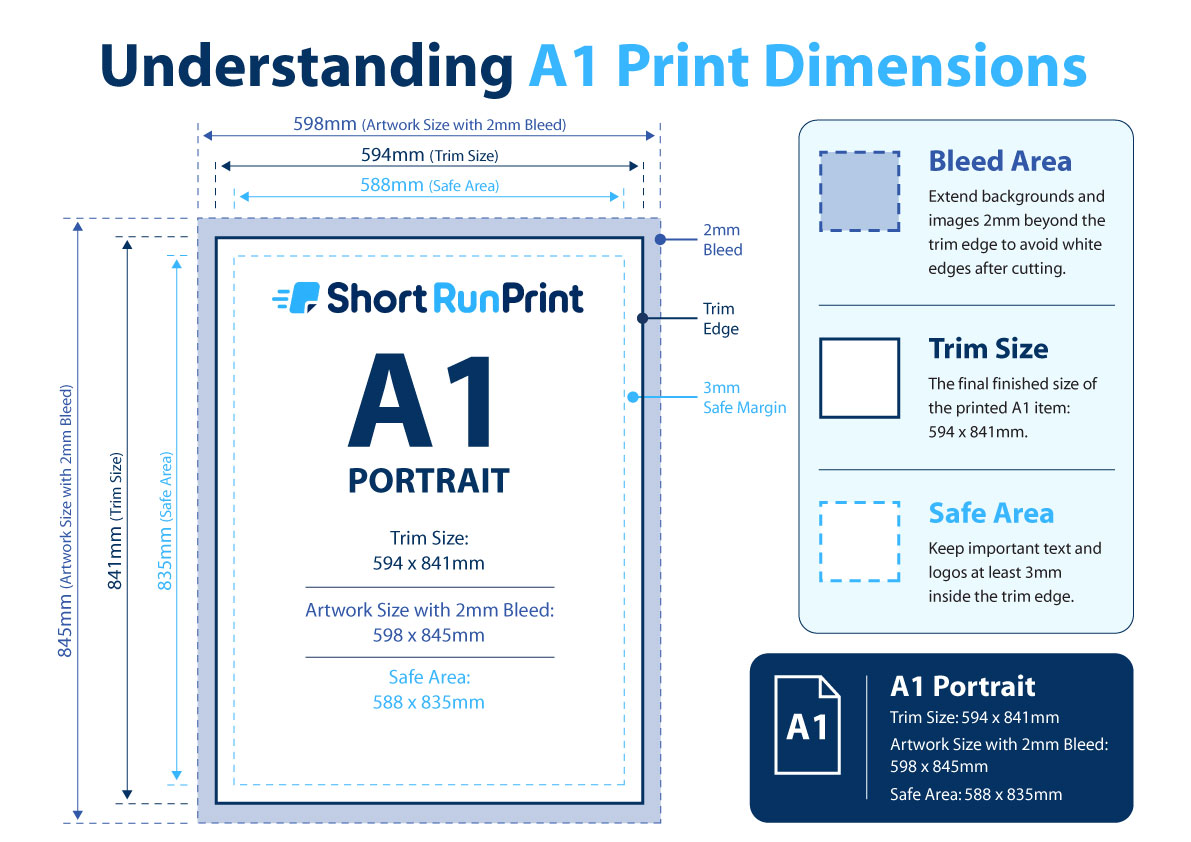
Bleed is the additional artwork that extends beyond the finished edge of your printed product.
If a background colour, photograph or graphic is intended to reach the finished edge, it needs to continue beyond the trim line.
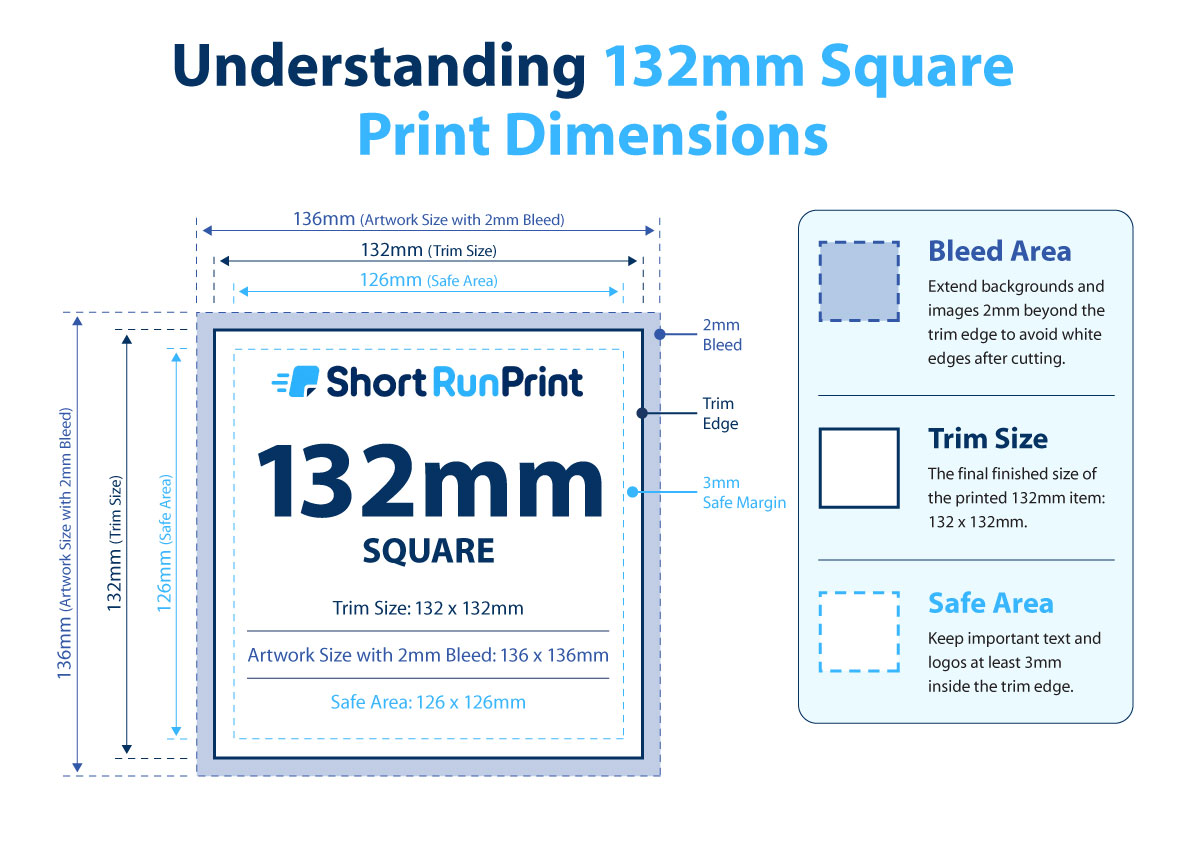
At Short Run Print, our standard requirement is 2 mm bleed around edges where artwork prints to the edge.
For example, an A5 flyer finishes at 148 × 210 mm. With 2 mm bleed added to all four sides, the complete artwork dimensions become 152 × 214 mm.
This extra artwork allows for small variations during cutting and helps prevent unwanted white lines appearing around your finished printing.
For a more detailed explanation, including examples for business cards and flyers, read our
guide to bleed, trim and safe areas.
4. Keep Important Text Inside the Safe Area
While backgrounds should extend beyond the trim into the bleed area, important information should be kept comfortably inside the finished dimensions.
This is known as the safe area.
At Short Run Print, we recommend keeping important content at least 3 mm inside the finished edge.
This includes:
- Business names
- Logos
- Telephone numbers
- Email and website addresses
- Headings and important text
- QR codes
- Prices and offer details
You can still have decorative elements and photographs extending beyond the safe area. The important thing is to avoid positioning essential information too close to the cutting edge.
5. Check Your Image Resolution
Image resolution is another important part of preparing artwork for printing.
A photograph may look sharp on a phone or computer monitor but appear blurry or pixelated when printed at a larger physical size.
This happens because digital images contain a fixed number of pixels. When the image is enlarged, those pixels are spread over a larger area.
For photographs and other raster images that will be viewed close up, approximately 300 pixels per inch (ppi) at the final printed size is a useful target.
For example, an image that looks sharp when printed at A6 may not contain enough detail to reproduce equally well at A3.
Simply changing a file's DPI setting or enlarging a small image does not automatically create additional detail. Whenever possible, use the highest-quality original image available.
6. Avoid Blurry or Pixelated Images
When checking your artwork, pay particular attention to photographs, logos and other graphics that may have been downloaded or copied from websites.
Images intended for websites are sometimes supplied at relatively small dimensions because they only need to be displayed on a screen.
If these images are enlarged considerably for printing, they may look soft, blurry or pixelated.
Where possible, use the original high-resolution image rather than a thumbnail, screenshot or image copied from a website. If you're using a logo, a suitable vector version can also help maintain sharp edges and clean lettering.
7. Understand RGB and CMYK Colours
Another difference between creating artwork for a screen and preparing it for professional printing is the way colours are reproduced.
Computer monitors, phones and tablets use RGB (red, green and blue) light to display colours.
Most full-colour commercial printing uses CMYK (cyan, magenta, yellow and black) inks or toners.
Some colours, particularly very bright blues, greens and other vivid shades, may look different when printed compared with how they appear on a screen.
This doesn't necessarily mean there is anything wrong with your artwork. It is partly a result of the different ways screens and printing equipment reproduce colour.
RGB artwork can still be suitable for uploading, but colours may be converted as part of the printing process. If precise colour reproduction is important, it is worth preparing your artwork with print colour limitations in mind.
8. Choose a Suitable File Format
Once your design is finished, you need to save or export it in a suitable format.
Some common artwork formats include:
- PDF: often the preferred format for professional printing because it can preserve page dimensions, text, graphics and layout.
- JPG or JPEG: a common image format suitable for photographic artwork, provided the resolution and quality are sufficient.
- PNG: an image format that can preserve sharp digital graphics, although suitability depends on the artwork dimensions and resolution.
A high-quality print-ready PDF is generally a good choice when exporting a finished design from applications such as Canva or professional design software.
However, the file format alone doesn't guarantee that artwork is print-ready. A PDF containing a blurry image or an incorrectly sized design can still produce poor printing.
9. Make Sure Your Fonts and Text Display Correctly
If you're supplying artwork as a PDF, check that all of the fonts display correctly when you open the exported file.
PDF files can contain embedded fonts, which helps preserve the appearance of text when the file is opened on another computer.
Depending on the design application, you may also have options to convert text to outlines. This can help preserve the lettering, although it makes the text less convenient to edit afterwards.
The simplest check is to open your finished PDF and inspect the text carefully. Make sure the typefaces, spacing and layout match the design you intended to print.
10. Check All Spelling and Contact Details
Even correctly prepared artwork can contain mistakes in the information being printed.
Before placing your order, carefully check:
- Spelling and punctuation
- Business names
- Telephone numbers
- Email addresses
- Website addresses
- Postal addresses
- Prices and offers
- Event dates and times
- Names and job titles
If your design includes a QR code, scan it with a phone to make sure it works and opens the correct destination.
These checks are especially important for business cards and promotional flyers, where incorrect contact details could make it difficult for potential customers to reach you.
11. Check Both Sides of Your Artwork
If you're ordering double-sided printing, make sure the correct artwork has been supplied for both sides.
For example, a business card may have a logo on the front and contact information on the reverse. A flyer might use the front for its main promotion and the back for additional information.
Check that both designs have the same intended finished dimensions and the correct orientation.
For folded leaflets, it is particularly important to follow the relevant artwork guide because the positions of the panels will determine how the finished leaflet folds and reads.
12. Should I Include Crop Marks?
Crop marks are small lines positioned outside the finished artwork that indicate where the printed product should be trimmed.
Some design applications allow you to include crop marks when exporting a print-ready PDF.
Crop marks and bleed are not the same thing. Crop marks indicate the intended cutting position, while bleed provides extra background artwork beyond that position.
Follow the requirements shown in the Artwork Guide for the product you're ordering. Adding crop marks does not replace the need to include bleed when your design prints to the finished edge.
Can I Use Artwork Created in Canva?
Yes. Canva is a popular way of designing flyers, business cards, invitations and other printed products.
When creating your design, choose the correct finished dimensions and allow for bleed where the artwork reaches the edge.
Canva's standard bleed is approximately 3.175 mm, which is slightly larger than our usual 2 mm requirement. This is fine for the Short Run Print artwork uploader.
For more information, see our
guide to preparing a Canva design for printing.
Can I Print Artwork Created Using AI?
Yes. Artwork created using AI tools such as ChatGPT, Gemini, Copilot and other image-generation services can also be used for professional printing.
However, AI-generated images may not automatically match standard print dimensions or include the bleed required for a finished printed product.
You should also check the resolution and inspect any AI-generated text carefully, particularly telephone numbers, business names and other important details.
Our
guide to getting AI-generated artwork printed
explains these checks in more detail.
How Do I Upload Print-Ready Artwork to Short Run Print?
Once your artwork is finished, you can upload it as part of the ordering process.
- Choose the printed product you require.
- Select the size, quantity and available print options.
- Click Add to Basket and Upload.
- Upload your finished artwork file.
- Check the low-resolution artwork preview.
- Adjust the scale of your artwork if required.
- Continue to your basket and review the preview again.
- Choose your delivery option and complete your order.
The preview allows you to check the content and positioning of your design before ordering.
If you notice something that isn't right, amend your original artwork and upload the corrected version before completing your purchase.
Does the Artwork Preview Check Everything?
No. The preview is a low-resolution proof intended to show the content and positioning of your uploaded artwork.
It is useful for checking whether you've uploaded the correct file, whether the orientation is right and whether the design appears correctly positioned.
However, it should not be treated as a guarantee that every part of your artwork is technically correct.
For example, the low-resolution preview may not reveal every problem with image quality, spelling or fine details. This is why it is important to check the original file carefully before uploading it.
What Happens If My Artwork Isn't Print-Ready?
The result depends on the problem.
If your design has the wrong proportions, for example, you may need to resize or crop it to fit the product you want to order.
If the artwork has insufficient resolution, you may need to replace an image with a higher-quality version.
If the design doesn't include bleed, you may need to extend the background beyond the finished edges.
Where possible, make these corrections in the original design application and export a new version of the file. This will usually give you more control than trying to correct the layout simply by enlarging the uploaded image.
Before uploading your artwork: check the finished size, orientation, bleed, safe area, image quality, file format, text and contact details. Open the final exported file and make sure everything looks correct before placing your order.
Common Questions About Print-Ready Artwork
What does print-ready mean?
Print-ready means that a design has been prepared for professional printing. It should have the correct dimensions, suitable image quality, required bleed and safe areas, and all of the final content in place.
What is a print-ready PDF?
A print-ready PDF is a PDF file that has been prepared with the correct page size, suitable resolution, fonts and graphics, and any bleed required for the printed product. A PDF isn't automatically print-ready simply because it has been saved in that format.
What resolution should print-ready artwork be?
For photographs and raster images viewed close up, approximately 300 ppi at the final printed size is a useful target. The important consideration is whether the image contains enough detail for the physical size at which it will be printed.
Can a JPG be print-ready?
Yes. A high-quality JPG can be suitable for printing if it has the correct dimensions, sufficient resolution and any required bleed. However, a PDF may be preferable for designs containing text and vector graphics.
Can a PNG file be used for printing?
A PNG can be suitable for printing provided the image dimensions and resolution are sufficient. Like JPG files, PNG artwork should also match the required print proportions and include bleed where necessary.
Does print-ready artwork need bleed?
If the design contains backgrounds, photographs or graphics that print to the finished edge, bleed is required. Short Run Print normally asks for 2 mm bleed beyond the trim line.
Do I need to convert my artwork to CMYK?
Not necessarily. RGB artwork can still be suitable for uploading, although it may be converted for printing. Because screens and printing equipment reproduce colours differently, some colours may change in the finished print.
Can I use a screenshot as print-ready artwork?
A screenshot may not contain enough image detail for professional printing, particularly when enlarged. It is generally better to use the original high-resolution artwork or export a suitable file directly from the application used to create it.
Can I upload artwork that isn't exactly the right size?
Short Run Print allows you to adjust the scale of uploaded artwork, which can help with positioning. However, scaling may crop parts of your design or affect image quality. Starting with the correct dimensions is preferable.
Will the printer correct mistakes in my artwork?
You should supply your artwork with the correct content and positioning. The upload preview allows you to check your design before ordering, but it does not replace proofreading or checking the technical quality of your original file.
How do I know if my artwork is ready to print?
Check that the file matches the product's finished dimensions, includes bleed where needed, keeps important content within the safe area and contains suitable-quality images. You should also check every word and number, open the final exported file and review the uploaded preview before ordering.
Ready to Get Your Artwork Printed?
Once you've checked your artwork, choose the printed product you need, select your options and upload your finished design. Our online ordering system lets you check the artwork preview before completing your order.
Every product page includes an Artwork Guide showing the finished dimensions, required bleed and recommended safe area for that particular product.
Free standard delivery on every order • Printed in the UK