Bleed, Trim and Safe Areas Explained: A Guide to Print Artwork
If you're preparing artwork for professional printing, you've probably come across terms such as bleed, trim and safe area. They might sound technical, but understanding these three things can help you avoid unwanted white edges, missing text and other problems with your finished printing.
Whether you're designing a business card, flyer, leaflet, poster or invitation, the same basic principles apply. In this guide, we'll explain what each term means, why it matters and how to prepare your artwork correctly before sending it to print.
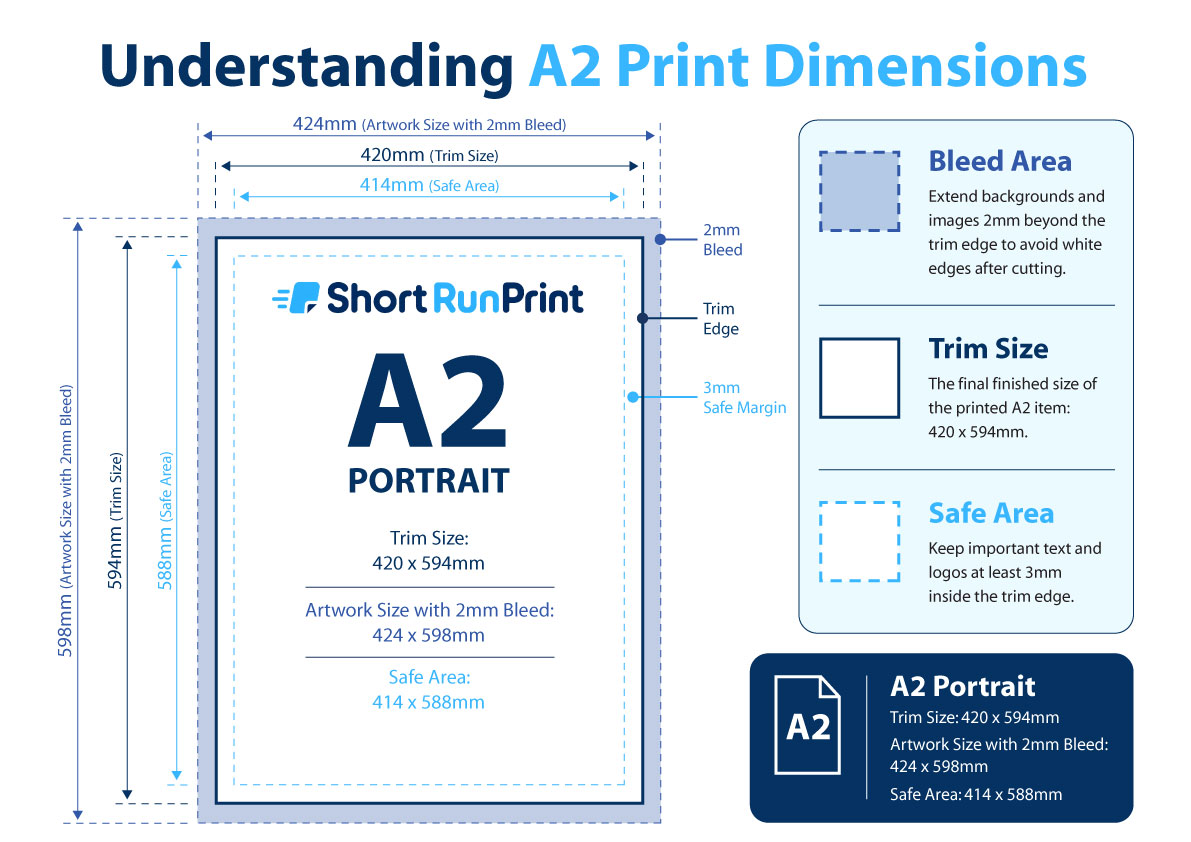
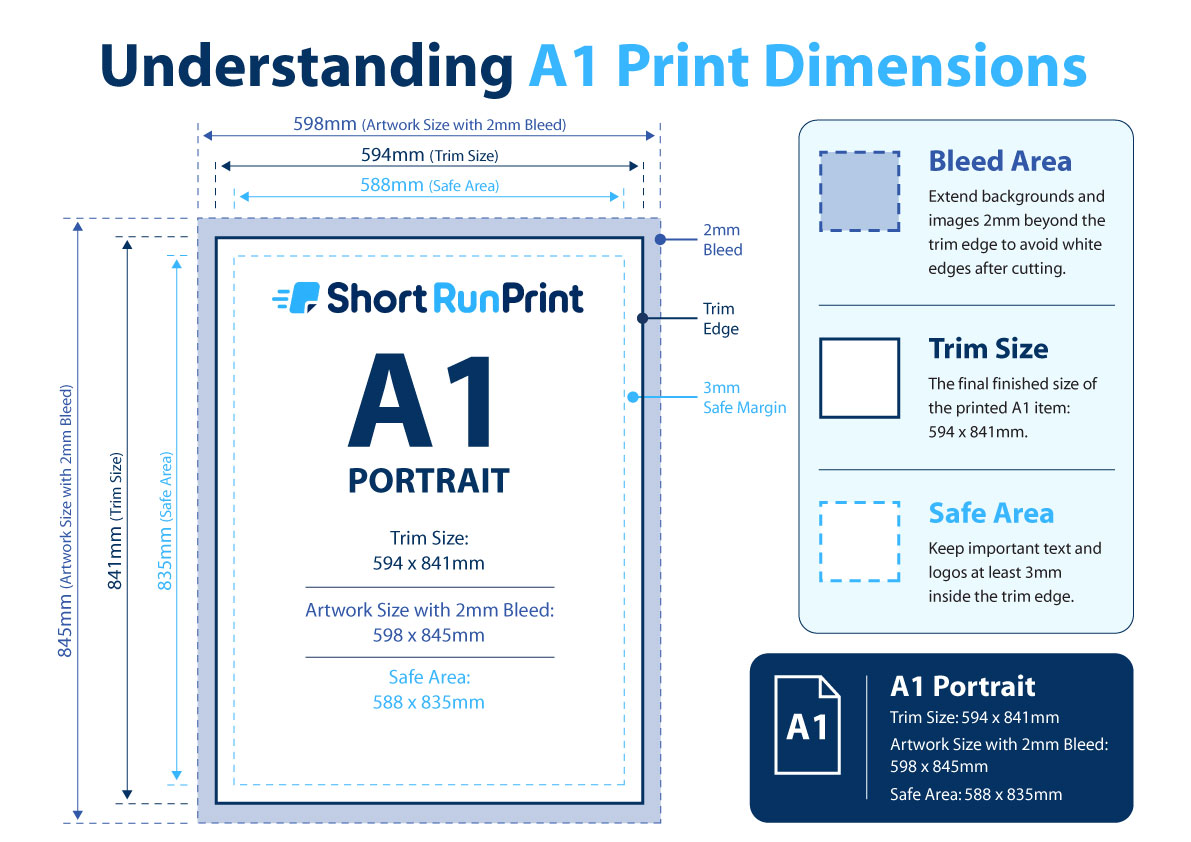
Quick answer: Bleed is extra artwork extending beyond the finished edge, trim is where the printed sheet is cut to size, and the safe area is the space inside the trim where important text and logos should be kept. Short Run Print requires 2 mm bleed and recommends keeping important content at least 3 mm inside the trim.
What Is Bleed in Printing?
Bleed is the additional artwork that extends beyond the finished edge of a printed product.
For example, imagine you've designed an A5 flyer with a blue background that you want to print all the way to the edges. If your artwork stops exactly at the finished A5 dimensions, even a tiny variation during cutting could leave a thin white line along one or more edges.
By extending the blue background slightly beyond the finished size, the printer has extra artwork available when trimming the sheet. This helps ensure the background reaches the edge of the finished flyer.
At Short Run Print, we require 2 mm bleed on each edge where artwork runs to the finished edge. Your background colours, photographs and graphics should continue into this additional area rather than stopping at the trim line.
Why Do Printers Need Bleed?
Commercial printing involves printing and then cutting paper or card to its finished dimensions.
Although modern cutting equipment is accurate, a small amount of variation is normal. Paper can also move slightly during printing and finishing.
If the artwork finishes exactly at the cutting position, a small variation may expose the unprinted paper underneath. This is what causes the thin white edges sometimes seen on incorrectly prepared printing.
Bleed helps prevent this by making sure there is printed artwork beyond the area that will normally be visible on the finished product.
What Is the Trim Line?
The trim line marks the intended finished edge of your printed product.
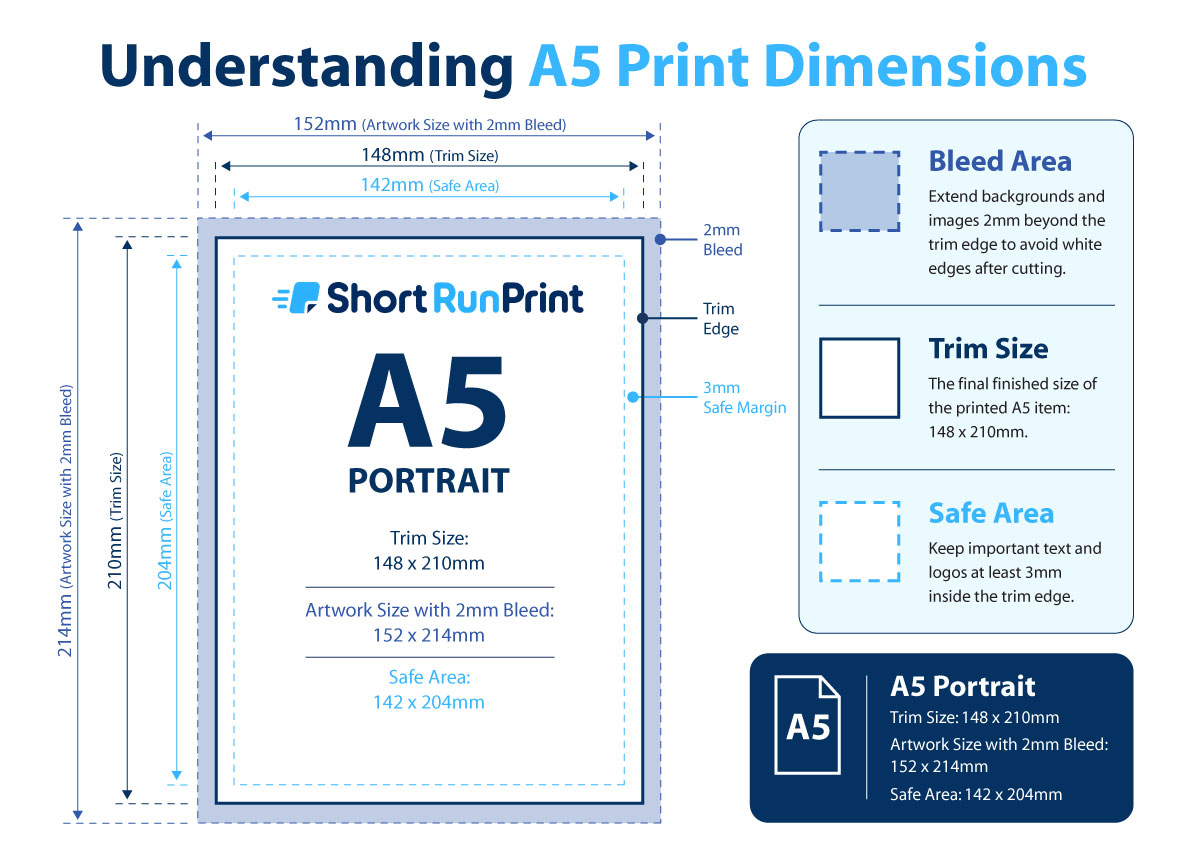
If you're ordering an A5 flyer, for example, the finished size is 148 × 210 mm. The trim line marks this finished size within your larger artwork file.
Anything outside the trim line is intended to be removed during cutting. However, because small cutting variations are possible, you should not position important text or other essential content directly against this line.
The trim line is therefore the boundary between the intended finished product and the additional bleed surrounding it.
What Is the Safe Area in Printing?
The safe area is the space inside the finished trim line where important content should be positioned.
While bleed extends the background outside the finished size, the safe area keeps essential information inside the finished size.
At Short Run Print, we recommend keeping important text, logos, telephone numbers, QR codes and other essential information at least 3 mm inside the trim line.
This provides some protection against normal cutting tolerances and helps prevent important information from appearing uncomfortably close to the edge.
You can still have background colours, photographs and decorative elements extending beyond the safe area. The important distinction is that anything essential to the design should remain comfortably within it.
Bleed, Trim and Safe Area: What's the Difference?
The easiest way to understand these three areas is to think of them as three boundaries within your artwork.
- Bleed: the additional artwork outside the finished size, which allows for cutting.
- Trim: the intended cutting position that determines the finished size.
- Safe area: the area inside the trim where important information should be kept.
For artwork with a background that prints to the edge, the design should continue through the bleed area, while important text and logos stay inside the safe area.
How Much Bleed Do I Need for Printing?
The amount of bleed required depends on the printer and the product being ordered.
At Short Run Print, our standard artwork requirement is 2 mm bleed around the finished size where printing extends to the edge.
For example, if you are designing an A5 flyer, you add 2 mm to the left, right, top and bottom edges.
Remember that this is 2 mm on each side, not 2 mm added to the overall width and height. The artwork therefore becomes 4 mm wider and 4 mm taller than the finished product.
Example: Adding Bleed to an A5 Flyer
An A5 flyer has a finished size of 148 × 210 mm.
To add 2 mm bleed around all four sides, the full artwork dimensions become:
- Finished size: 148 × 210 mm
- Bleed: 2 mm on each side
- Artwork size including bleed: 152 × 214 mm
- Recommended safe area: 3 mm inside the finished edge
The additional 2 mm around the outside is intended to be cut away. Your background should extend across the entire 152 × 214 mm artwork area if it prints to all four edges.
Important text and logos should remain at least 3 mm inside the finished A5 dimensions.
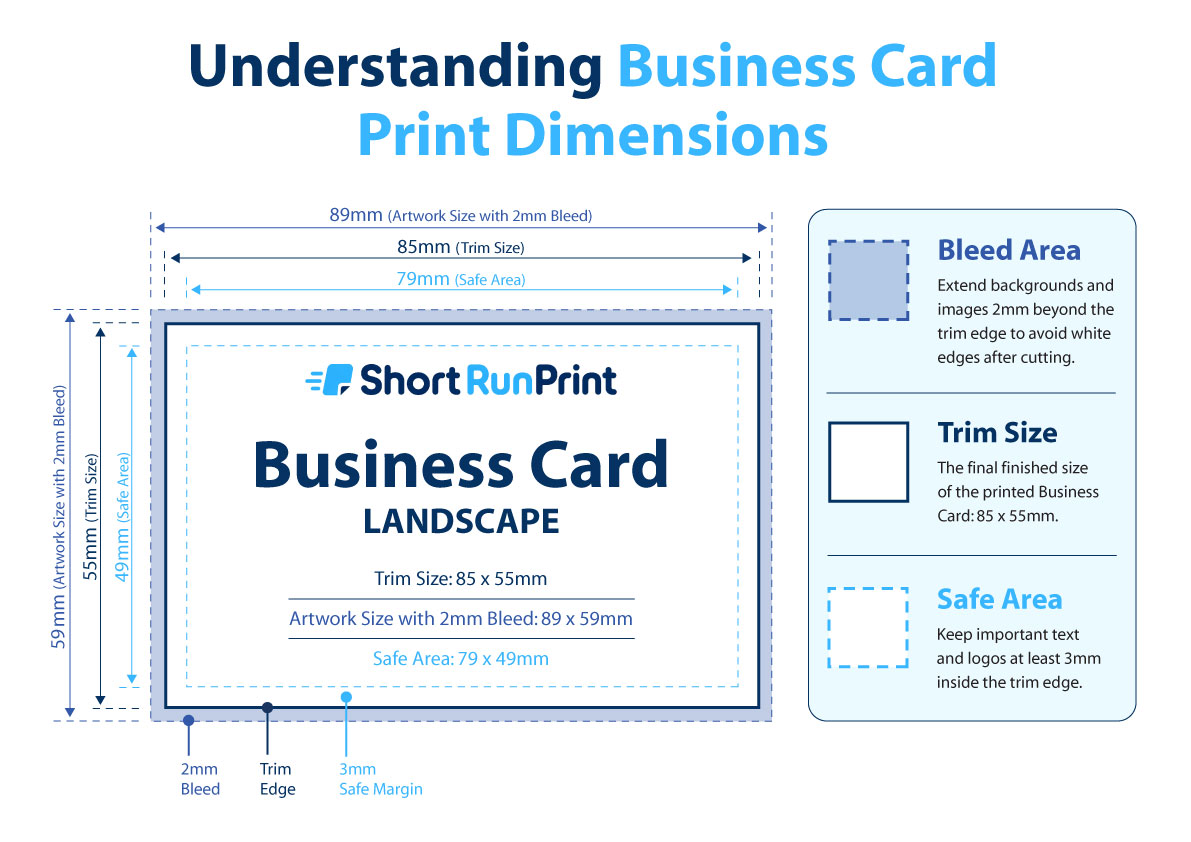
Example: Adding Bleed to a UK Business Card
Standard UK business cards have a finished size of 85 × 55 mm.
With 2 mm bleed on all four sides, the complete artwork dimensions become 89 × 59 mm.
For business cards, the safe area is particularly important because the finished product is relatively small.
Keep names, telephone numbers, email addresses, logos and other important details at least 3 mm inside the finished edge. Decorative backgrounds and graphics can continue beyond the trim line into the bleed.
Common Print Sizes Including 2 mm Bleed
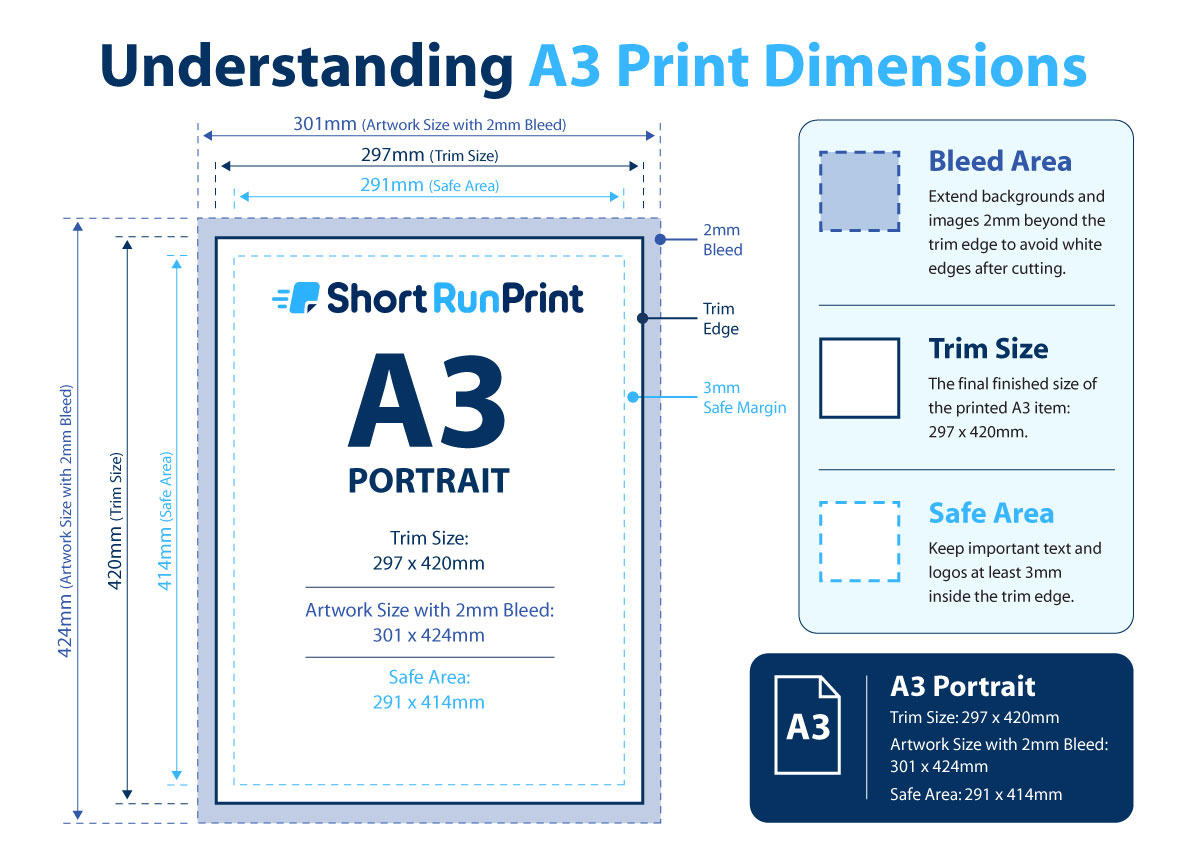
The following examples show how adding 2 mm bleed on every side changes the overall artwork dimensions.
| Product |
Finished Size |
Including Bleed |
| A7 Flyer |
74 × 105 mm |
78 × 109 mm |
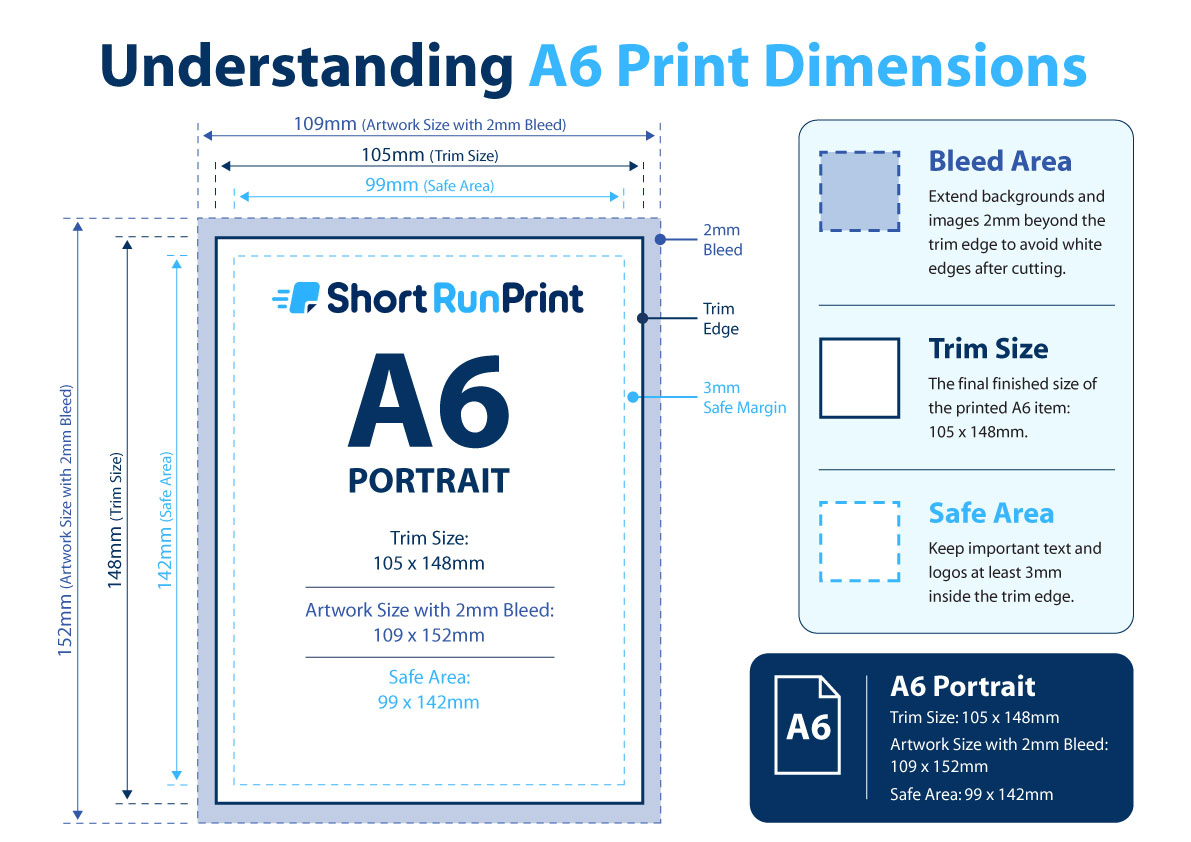
| A6 Flyer |
105 × 148 mm |
109 × 152 mm |
| A5 Flyer |
148 × 210 mm |
152 × 214 mm |
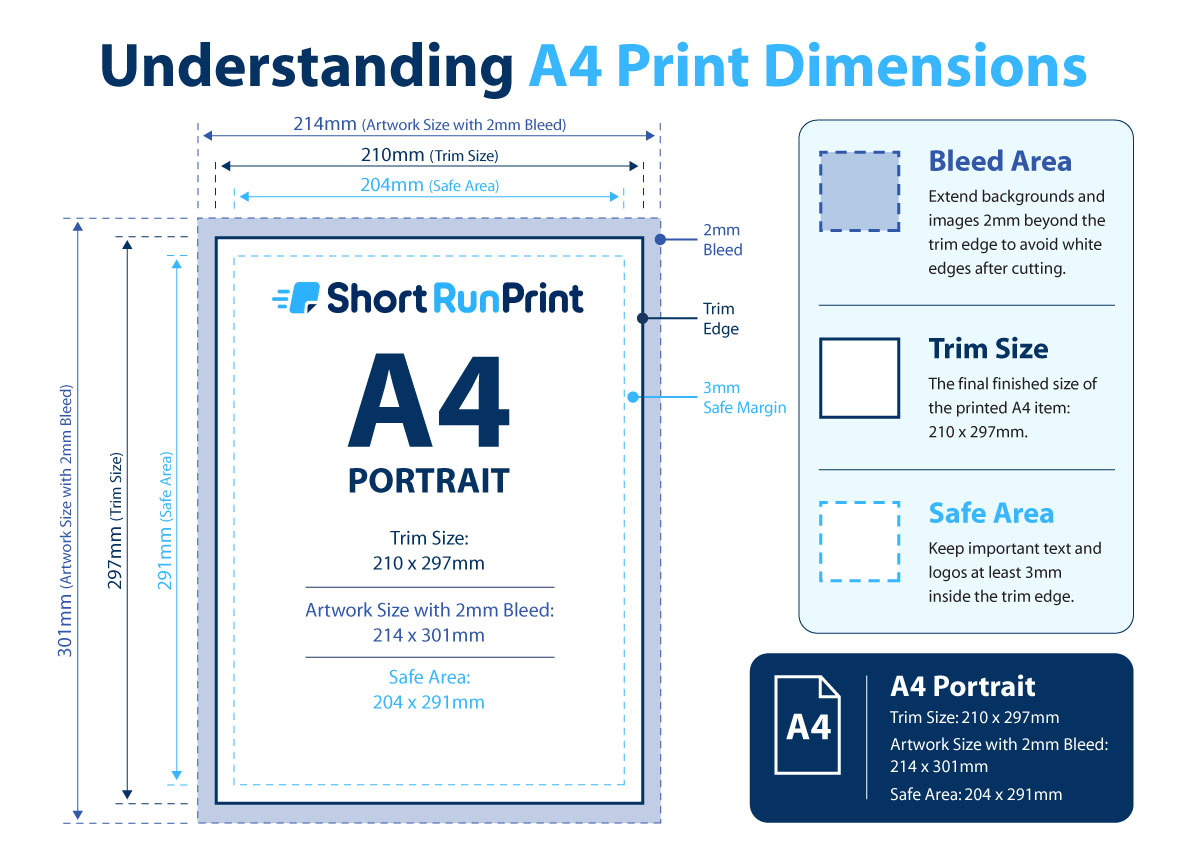
| A4 Flyer |
210 × 297 mm |
214 × 301 mm |
| DL Flyer |
99 × 210 mm |
103 × 214 mm |
| UK Business Card |
85 × 55 mm |
89 × 59 mm |
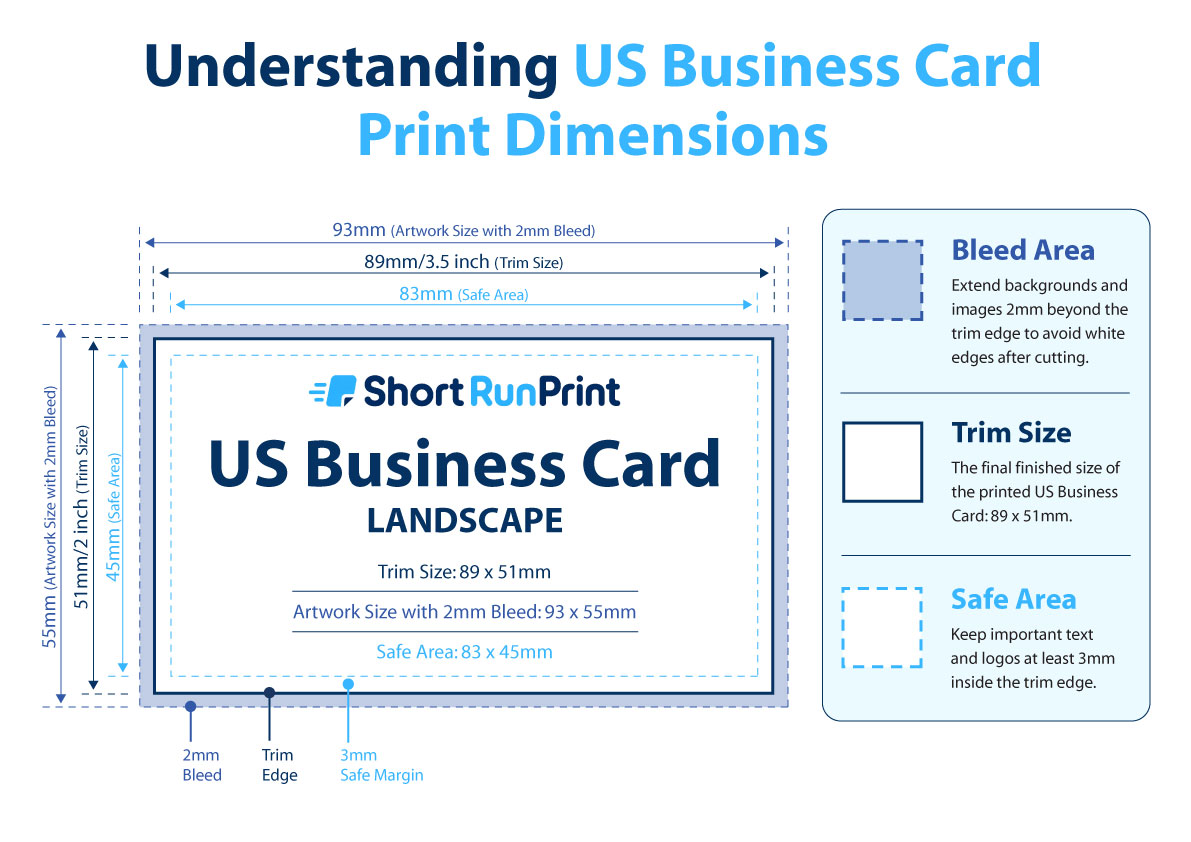
| US Business Card |
89 × 51 mm |
93 × 55 mm |
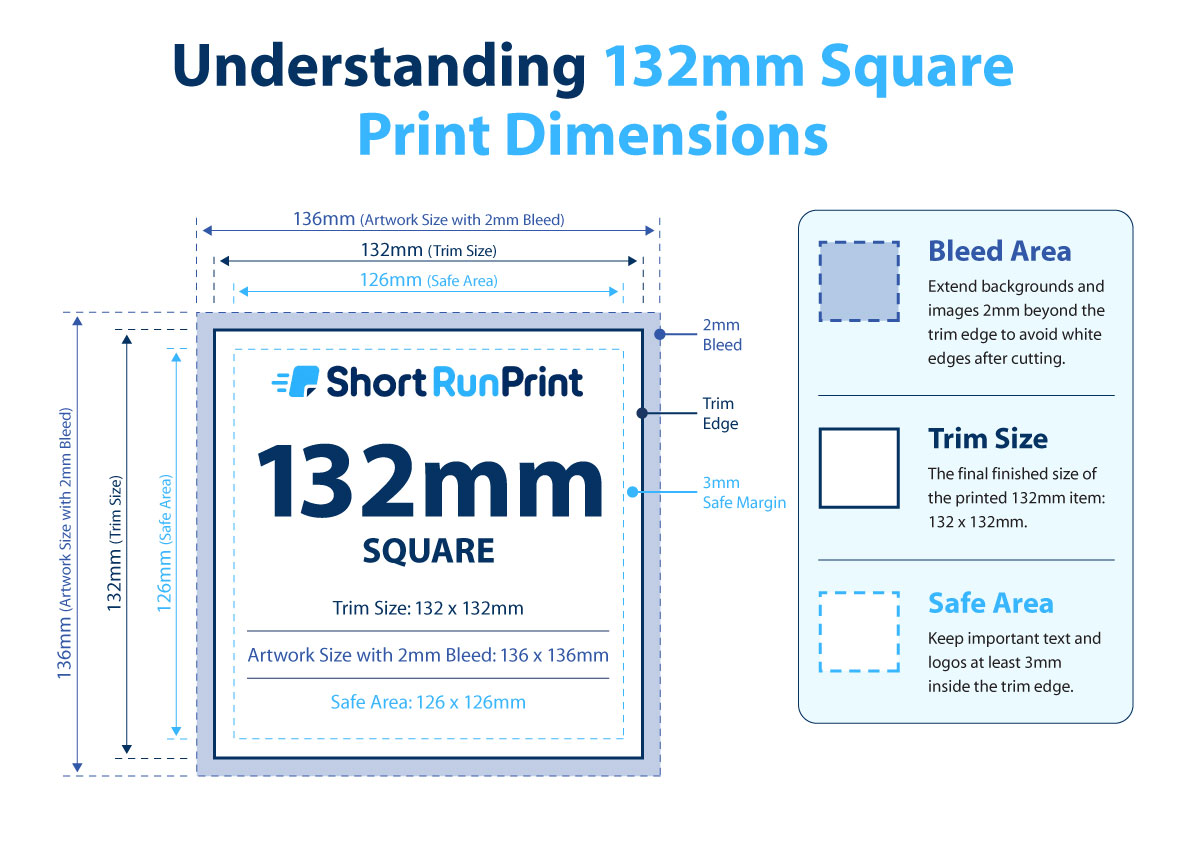
| 132 mm Square |
132 × 132 mm |
136 × 136 mm |
These examples assume bleed is required on all four edges. Always check the individual Artwork Guide on the product page for the relevant dimensions and any product-specific requirements.
What Happens If My Artwork Doesn't Have Bleed?
If your artwork has a photograph, background colour or graphic that stops exactly at the finished size, there may not be enough additional artwork available for trimming.
Depending on the file and its positioning, this can result in a thin white line along one or more edges of the finished printing.
The best solution is to extend the existing background beyond the finished dimensions before uploading the artwork.
If your artwork has already been created without bleed, you may also be able to adjust its scale during the upload process. However, increasing the scale can crop some content, so it is important to check that no text or other essential elements are lost.
Does Every Design Need Bleed?
Not necessarily. Bleed is particularly important when colours, photographs or other design elements are intended to reach the edge of the finished product.
If your design has a completely white background and all of the content is positioned well inside the finished edges, there may be no visible background artwork that needs extending beyond the trim.
However, if your design contains a coloured border, photograph or other element that reaches the edge, it should extend into the bleed area. The relevant product Artwork Guide will show the requirements for that product.
Can I Just Add a White Border to Create Bleed?
No. Adding a white border around a design that is supposed to print right to the edge is not the same as adding proper bleed.
For example, if your flyer has a green background, the bleed should also contain the same green background. If your design uses a photograph that reaches the edge, the photograph should continue beyond the trim line.
Simply placing the finished artwork in the middle of a larger white document could still leave unwanted white edges after cutting.
Should I Put a Border Around My Flyer or Business Card?
You can use a printed border as part of your design, but borders close to the finished edge need careful consideration.
Because small cutting variations are normal, a narrow border positioned very close to the trim may appear slightly uneven on the finished product.
If you want a visible decorative border, leave generous space between it and the finished edge. This makes small cutting variations less noticeable and generally gives the design a more balanced appearance.
How Do I Add Bleed to Artwork Created in Canva?
If you've created your design using Canva, you can export it with crop marks and bleed using the options available when downloading a PDF for printing.
Canva's standard bleed is approximately 3.175 mm, which is slightly more than the 2 mm required by Short Run Print. This is fine for our artwork uploader.
The important thing is to make sure the background photographs, colours and graphics extend into the bleed area rather than stopping at the original page edge.
For more detailed instructions, see our guide to preparing Canva artwork for printing.
What About AI-Generated Artwork?
Artwork created using ChatGPT, Gemini, Copilot or another AI tool may not automatically include the bleed required for professional printing.
AI-generated designs are often supplied as images that finish exactly at their visible edges. If the design is intended to print right to the edge of a flyer or business card, you may need to extend the background beyond the finished size.
You should also check that important text, logos and contact details are positioned within the safe area. For more information, see our guide to getting AI-generated artwork printed.
Do Posters and Invitations Need Bleed Too?
Yes. The same basic principle applies to most printed products when the design reaches the finished edge.
For example, if an invitation has a decorative coloured background that extends to all four edges, the background should continue into the bleed area.
Similarly, if a poster contains a full-page photograph, the image should extend beyond the intended trim position.
For folded leaflets and other products with more complicated layouts, you should follow the Artwork Guide for that particular product, as the folding and panel arrangements may introduce additional considerations.
Check Your Artwork Before Uploading
Before placing an order, it is worth carrying out a few simple checks.
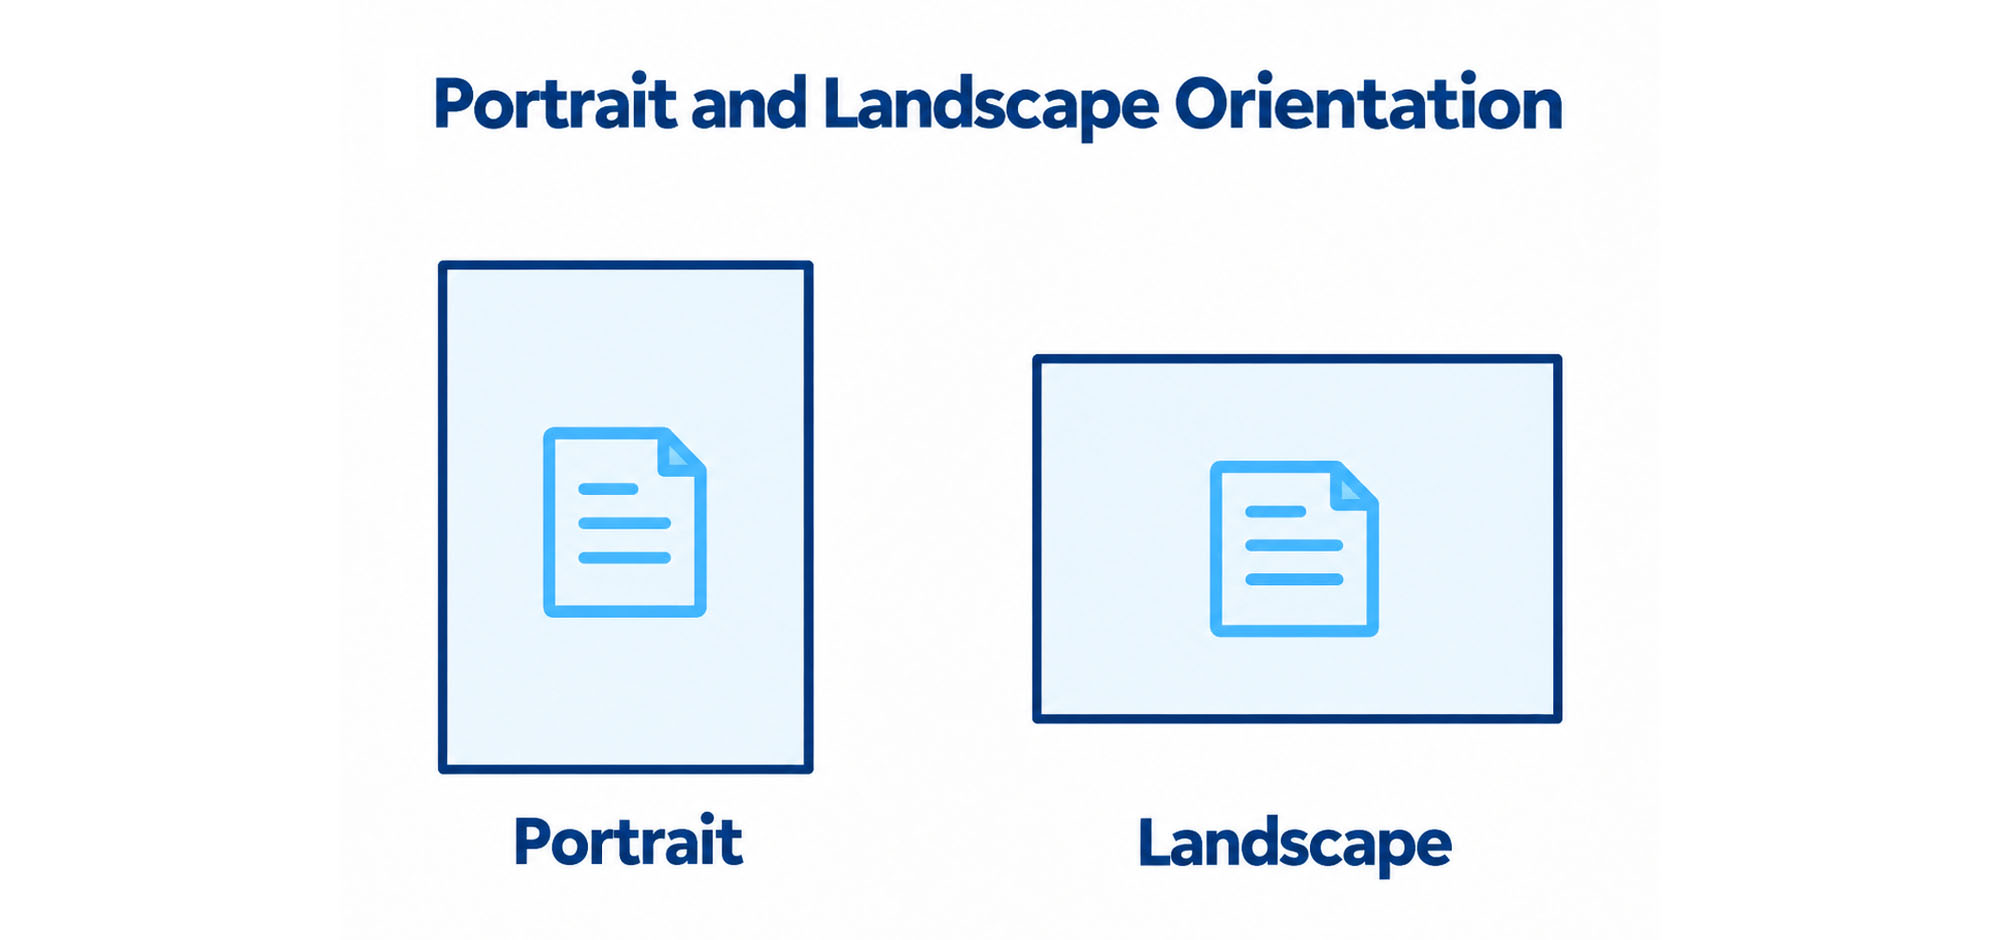
- Make sure your artwork matches the intended finished size and orientation.
- Extend backgrounds and images into the required bleed area.
- Keep important information at least 3 mm inside the trim line.
- Check that no text or logos will be cut off.
- Check spelling, telephone numbers, prices and dates.
- Make sure photographs and graphics are suitable for the printed size.
- Open the finished file and inspect it before uploading.
When you upload your artwork to Short Run Print, you'll see a low-resolution preview showing its content and positioning. You can adjust the scale if required, and the preview will be displayed again in your basket before checkout.
Remember that the preview is intended to show content and positioning. It is not a guarantee that the supplied artwork meets every technical requirement or that all details are correct, so always check your original file carefully.
Remember: Extend backgrounds 2 mm beyond the finished edge and keep important text at least 3 mm inside it. These two simple steps help prevent unwanted white edges and essential content being cut too close to the trim.
Common Questions About Bleed and Safe Areas
What does 2 mm bleed mean?
Two millimetres of bleed means extending your background artwork 2 mm beyond each finished edge. For example, an A5 flyer measuring 148 × 210 mm would have overall artwork dimensions of 152 × 214 mm when 2 mm bleed is included on all four sides.
Is bleed included in the finished size?
No. The finished size refers to the dimensions of the product after cutting. Bleed is additional artwork outside those dimensions and is normally removed during trimming.
What is the difference between bleed and safe area?
Bleed is extra artwork outside the intended trim line, while the safe area is inside it. Bleed helps prevent unwanted white edges, and the safe area helps keep important content away from the cutting position.
How much bleed does Short Run Print require?
Our standard artwork requirement is 2 mm bleed around edges where the design prints to the finished edge. Check the Artwork Guide on the relevant product page for any product-specific instructions.
How far from the edge should text be?
We recommend keeping important text, logos and other essential content at least 3 mm inside the finished trim edge. Leaving additional space can also improve readability and make the design feel less crowded.
What happens if my artwork has no bleed?
If the design prints to the edge but has no bleed, a small cutting variation may produce an unwanted white line. Extending the background beyond the finished dimensions helps prevent this.
Can I add bleed after finishing my design?
Usually, yes, provided you can edit the original artwork or extend its background appropriately. Simply enlarging the document with a white border does not create proper bleed for a full-colour background.
Does bleed need to be added on all four sides?
If the design prints to all four edges, the background should extend beyond all four edges. If only part of the artwork reaches a finished edge, bleed is required wherever that artwork needs to continue beyond the trim.
Do I need bleed for a white background?
If your design has a plain white background and all other elements are comfortably inside the finished dimensions, there may be no background artwork to extend. However, you should still use the correct finished size and follow the requirements shown in the product Artwork Guide.
Can I adjust my artwork when uploading it?
Yes. Short Run Print allows you to adjust the scale of your uploaded artwork. This can help with positioning, but make sure any adjustment does not crop important text, logos or other information.
Ready to Get Your Artwork Printed?
Now that you understand bleed, trim and safe areas, you can prepare your artwork with greater confidence. Choose your printed product, upload your finished design and check the preview before ordering.
Every product page includes an Artwork Guide showing the finished size, required bleed and recommended safe area for that particular product.
Free standard delivery on every order • Printed in the UK